
Making a green wood bowl blank is essentially the process of preparing a particular piece of fresh-cut wood to a given size and shape.
Creating a green wood bowl blank involves removing as much of the surrounding excess wood as possible in preparation for the blank to later be easily turned on the lathe.
Making your own green wood bowl blank is the foundation for the bowl design process. Because you are working with the raw timber, you get to make all the decisions regarding the location of cuts, which will dictate the eventual bowl appearance.
Design decisions cannot be as easily accomplished when purchasing prepared bowl blanks, as those decisions have already been made.
While it may be a bit of work, making green wood bowl blanks is worth all the effort. The key is having the right equipment and understanding the process.
Knowledge removes the struggle and will take you from green wood bowl blank production to the lathe turning bowls sooner.
Equipment
Tools needed for the green wood bowl blank making processes include (See Recommended Green Wood Equipment Page for details);
- chainsaw (gas) and/or (electric)
- bandsaw
- awl
- hammer
- measuring tape
- pencil
- compass
- scrap cardboard
- Anchorseal
- chip brushes
Gas Chainsaw
A larger gas chainsaw best handles larger trees and limbs. I use a gas chainsaw for most logs over 10 inches in diameter. The power and torque are beneficial when dealing with heavy full-size timber. Limbs and trees under eight or 10 inches can be handled well with an electric chainsaw, which is also much quieter than its gas cousin. Here is a link to a high-quality gas 27-inch Echo Chainsaw I use to cut larger logs and trees. The 27″ bar is large, but ideal for most tree work and even the really big trees can be worked with this saw.
Electric Chainsaws
Corded electric chainsaws work well for quick cuts around the shop as they do not emit fumes like the gas chainsaws. Surprisingly, battery-operated chainsaws have come a long way recently. I own a 16″ Greenworks battery operated chainsaw, and it works great. It’s lightweight, super simple to operate, quiet and cuts very well. This type of cordless electric chainsaw is perfect for limbing and cuts up to about 6 inches in diameter.

Chainsaw Sharpening
With all chainsaws, it’s important to maintain the sharp blade teeth and keep an extra chain on hand.
Hand sharpening a chainsaw is very simple and straightforward. Only knowledge and a few tools are needed to sharpen your chainsaw, no matter where you are. Read this article next to discover the complete process of sharpening a chainsaw.
I also use the Timberline Sharpening Kit, which costs a bit more but is worth every penny. With this chainsaw sharpening system, I know I’m at the correct tooth angle (which you need to match to your chain when purchasing). Read the tooth angle details. The sharpening process is simple, just like sharpening a pencil in grade school. After each sharpening, there is a very noticeable improvement in cutting performance.
If you’re cutting often with a chainsaw, you might consider a dedicated bench chainsaw sharpening grinding wheel. This sharpening machine from Oregon Products returns chainsaw blades to almost brand new, out-of-the-box condition.
Bandsaw
If you are making green wood bowl blanks of a larger size, say larger than seven or eight inches in diameter, you will want at least a 12″ bandsaw when it comes to cutting them into a more manageable cylinder. However, these smaller bandsaws just don’t have the power to cut through green, wet wood much thicker than about three or four inches.
To cut larger green wood bowl blanks, I use a 17″ Grizzly bandsaw with a two horsepower motor. It’s important to use a three to four tooth per inch blade (Amazon link), at least one-half inch wide when cutting green wood on the bandsaw. Fine blades with more teeth will bind up more easily and potentially overheat causing the likelihood of breaking.
The model of bandsaw I use, linked above, also has a foot brake, which I like. It gives me the peace of mind to not worry about the free rotating wheels and blade after the saw has been turned off. The bandsaw wheels have so much momentum they rotate for over a minute after stopping the machine, but the foot brake stops them quickly.
Cylinder Templates
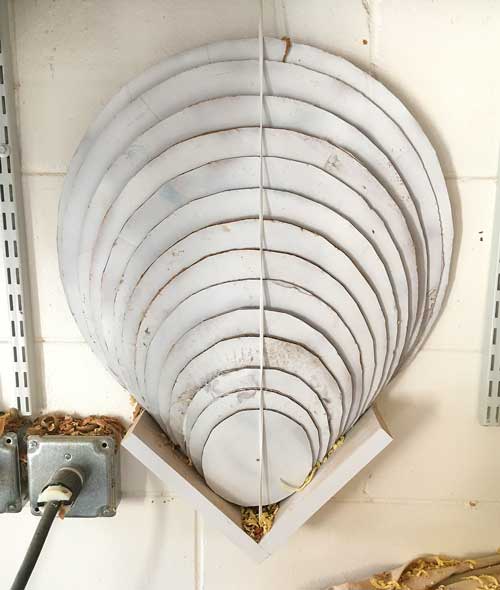
To make the cylinder cutting process much more manageable, take a little time and scrap cardboard to cut out circle templates. Make circles with a compass, in even inch increments, for the sizes of bowls you plan to create. I made a set of sizes ranging from five to 18 inches in diameter.
After one time too many shuffling and tripping over these templates, I fabricated a simple angled shelf to hold them in place and keep them handy. A strip of elastic cord running through the center keeps them all in place while allowing access from the side.
An awl is tapped through the template center into the green wood bowl blank and used to hold the template in place when cutting on the bandsaw.
Green Wood Bowl Blank Making – The Process
End Grain vs. Side Grain Bowl Blanks
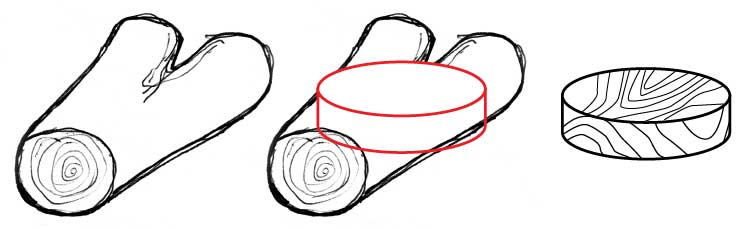
One of the first live demos I watched was a natural edged bowl. The bowl was side-grain on the lathe, like many bowls, and it turned out fantastic. During the demo, I started to wonder if a crotch or branched off “y” section of wood could be turned down into the crotch area, making a natural edged, end-grain, y-shaped vessel.
Afterward, I went up to the demonstrator and asked that question. He looked at me like I had a third eye growing out of my forehead. “No, you can’t turn it that way, because that would be end grain and bowls aren’t made with end grain” was his response. Feeling a bit silly for asking the question, I started to question his answer more.
If you’ve read my ‘About Me’ section, you know I don’t believe things have to be only one way. My natural reaction to anyone saying it has to be a certain way is “why?” I’ve found in many cases things are a certain way only because that person does them that way. And sure enough, that was the case for this guy, too.
Bowls are usually turned from side grain, with the wood grain running across the bowl walls, perpendicular to the horizon. However, bowls can also be turned from end grain, where the grain runs straight across and parallel to the lathe bed. And guess what? Since being told that a crotch cannot be turned, I’ve seen several examples of that very thing.
The majority of the bowls I turn are side grain bowls and that is what I usually make, but not always. You are welcome and encouraged to do whatever you’d like. 😉

Rough Small Blanks
Branches and logs less than eight inches in diameter are great for making small bowls. The best way to process these smaller logs or branches is to cut them into usable lengths. If they are not turned soon, cut them about six inches longer than the diameter.
For example, if the branch is five inches in diameter, cut segments 11 inches long. Later, when you are ready to turn these, any checks or cracks on the ends can be trimmed off leaving a clear, usable piece of wood in the middle.
Be careful with smaller wood pieces while using the chainsaw. Because the smaller branches are relatively lighter, the chainsaw tends to grab and throw them. Making a simple log splitting rack from two by fours is a great idea. This cutting rack will more securely hold the wood in place, save your back from bending over, and prevent the chainsaw from hitting the ground and quickly dulling the blade.
Once the smaller pieces are cut to the length, you may decide to split them in half or leave them whole. I’ve turned many small bowls from whole branches which leaves the pith in the side walls of the bowl. That’s another example of a practice that some people claim “you should never do.” Well, it works and makes some very interesting bowls, too. Again, this is very dependent on the type of wood, how evenly the bowl walls are turned, and what is done to control the speed of drying. We’ll cover those items in a bit.
Rarely will I take a piece of small wood less than six to eight inches and round it off at the bandsaw. It certainly may be done, if you’d like. I’ve found it’s much easier to attach the wood to the lathe and quickly remove the waste area with the bowl gouge and begin shaping the bowl.
Larger Log Half Blanks
Logs over eight inches in diameter make great bowls and need a bit more attention in the green wood bowl blank making process. Because I turn side grain, I optimize logs by getting two blanks from each cut green wood bowl blank log, once they are split in half.
Because we want to try to reduce as much cracking as possible, one of the best things to do is split the log in half after cutting it to the length. If the green wood bowl blank will not be turned soon, add at least six inches longer than the diameter, like the previous example.
Splitting a log in half is best done with the chainsaw. A simple wood cutting rack will also be very beneficial for this process. Laying the log on its side, locate the pith on both ends (sometimes it can shift quite a bit within a short distance). Visualize an imaginary line connecting the two ends and begin cutting through the bark.
Long clean shavings will be produced as the chainsaw tears the wood from the log. Once complete, you will have two green wood bowl blank halves with a great deal of internal tension being released from the log, reducing future cracks. Check out my article about Wood Bowl Crack Fix Secrets.
Sooner or Later
At this point in the green wood bowl blank making process, a decision needs to be made. If you’re not planning on turning the green wood bowl blank very soon, I recommend sealing the ends by coating them liberally with Anchorseal (Amazon link) and stacking them in a covered area out of direct sunlight and excessive air movement. If the wood is to be turned soon, I will now proceed to the bandsaw to further remove waste material.

Cutting Cylinders
With the flat side of the green wood bowl blank down, and always DOWN, I will prepare the blank for cutting. “Support all cuts” is a bandsaw law. Never cut unsupported material; the flat side of the green wood bowl blank half-cylinder log has proper support, the curved bark side does NOT have support.
And to further demonstrate that things don’t have to be a certain way, you could cut with the bark side down if you made a specific bandsaw jig to hold and firmly support the log in that position. However, because that is not necessary and would take a lot of time to just prove a point, I don’t do that. The flat side works great.
And in case you may be wondering why the wood needs to be supported, it is due to the incredible downward force of the bandsaw. If the log were pushed through on the wobbly curved bark side of the log, it could easily catch, twist, bind and break the blade—not to mention the dramatic effect it would have on the wood and possibly the person holding the wood.
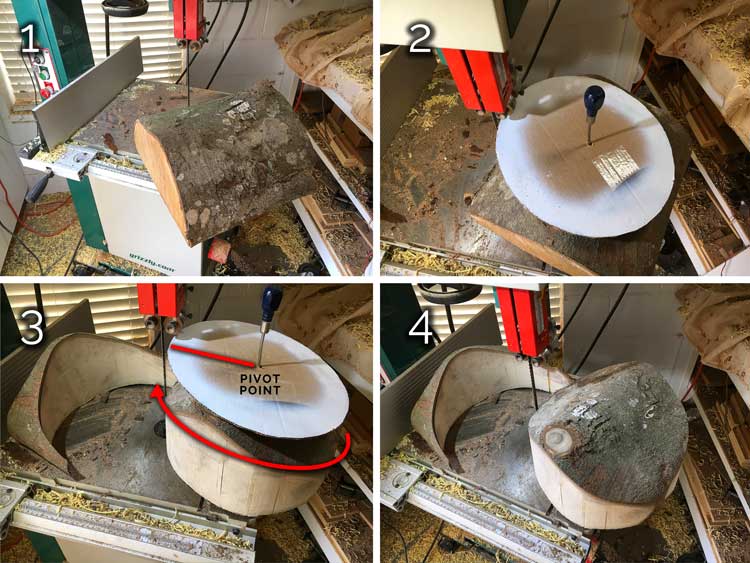
With the bandsaw off and the log lying flat side down on the bandsaw table, I select a cardboard circle template that best fits the log. It’s usually easier to use a template size a bit smaller than larger. After looking at the green bowl blank from different positions, place the circle on the log and tap the awl in the template center with a hammer to hold the template in place.
Use all necessary safety precautions especially safety glasses and turn the bandsaw on. Once up to speed, feed the log into the blade, working the blade close to the edge of the circle temple. Then guide the wood, so the center awl is ninety degrees to the blade’s right, if viewed from the front of the saw. Attempt to keep the awl in this same location and slowly rotate and feed the log through the blade. Once all the way around, the bowl blank is complete and ready for the lathe.
BIG Timber Blank Prep
Unlike smaller logs or branches, large logs offer some additional challenges, but many more opportunities. With more massive logs, it seems natural to want to make huge bowls. While this is possible, it usually makes more sense to cut multiple areas from the wood creating numerous opportunities for various turned pieces.
Just like all other wood pieces, the pith can be problematic. The pith does not have to be removed, but in most cases, it is best left out. Start by looking at the end of a large log. It’s possible to see many options, including cutting large sections which could be used for end grain bowls or hollow forms.
Large flat slabs can be dissected from these larger logs and easily turned cylindrical on the bandsaw, as described above. Platters and natural edge bowls can be created from the outer portions of the log. Smaller bowls can be made from inner side sections.
Cutting these pieces out of a larger log makes for greater control of grain patterns and angles and also helps further reduce internal pressures that may crack the wood. While there may be more chainsaw work and labor in freeing this green wood bowl blanks, the results will most likely be one of a kind.

Optimizing Crotch Blanks
The area where timber splits into a “y” making two branches is called a crotch, and this area usually contains special wood patterns that are highly desirable for bowl turning. The stress and pressure of one path joining the two branches into one create rippling grains within this section, which is called “flame” for its undulating v-shaped pattern.
The area to focus on is right around the “y” joint. While trimming crotch logs, cut off the top two branches of the “y” and leave plenty of room for a full circle directly in the center of the crotch. Make the bottom cut a straight, smooth ninety degrees across the bottom of the log.
The trimmed crotch can be cut in half with the chainsaw just as previously detailed with the full-sized log. And a circle template can be positioned to cover the most area before trimming it cylindrical on the bandsaw.
Bowl Blanks and Time


As moisture leaves a green wood bowl blank, and the wood dries unevenly, the potential for cracks increases. The sooner the blanks are turned, the better. If this isn’t possible, seal the end-grain with Anchorseal (Amazon link) as soon as possible to slow the drying process and reduce cracking. In some cases, the entire log can be sealed. I use this product on all my end-grain blanks, and it works very well.
Keeping the blanks in the ideal location for your particular climate is also essential. Typically, direct sunlight and breezy conditions are not desirable. Covering the blanks with a tarp can help.
When conditions are arid, it may be necessary to place green wood blanks in individual brown paper bags to hold in the timber’s moisture longer, for a slower release. A humidifier might also help slow the drying of green wood bowl blanks in extremely dry climates.

Study and Learn
If you have an opportunity to make several blanks from one source of wood, experiment and see what works best over time. Leave a whole log and a split log intact, seal a split log with Anchorseal, make a couple of cylindrical blanks and leave one, seal another and bag a third. Over time you will be able to tell what method works best for your particular climate and for the specific species of wood you’re working.

For a complete listing of all equipment mentioned in this article go to the Recommended Green Wood Bowl Blank Equipment page.
Making green wood bowl blanks is the beginning of the creative bowl making process and helps foster a deeply satisfying sense of accomplishment. Nothing is more gratifying than to be able to go to your own pile of various prepared green wood bowl blanks and select your next turned bowl to bring to life.
Leave me a comment and let me know if you work with green wood and what methods you use.
For details of the equipment mentioned in this article see my Recommended Equipment Guide.
Read these other articles about working with bowl blanks:
• TWICE TURNING WOOD BOWLS – HOW TO STEP BY STEP
• WOOD BOWL TURNING TROUBLE ZONE – DIRTY LITTLE SECRET
• DRYING GREEN WOOD BOWLS – 6 METHODS FOR SUCCESS
• TURNING GREEN WOOD BOWLS – THE PROCESS
Happy Turning,
Kent

26 Responses
Sorry but I am still confused….
You say it’s best to turn bowls asap after splitting but doesn’t that mean that the bowl will warp or even crack as it dries? I have access to as much fir/pine as I want and quite a lot of birch…. I would ideally not want to turn bowls twice but is it inevitable unless I let the wood dry fully before turning? But then your article says it’s best to turn immediately. Apologies if I’ve missed how one makes this judgement call…
Jonboy,
Ok, here’s the thing, think of a full log like a wet sponge. The center will be the last thing to dry. As the end-grain dries first there becomes tension between the dry end-grain and the wet center. The end-grain looses and cracks open. As it cracks it let air down deeper so it dries more and so on.
When you get a fresh log, the best thing to do is one of these two. You can once turn it and be done, but it may or may not warp as it dries, it really depends on the tree species. Or, you can “once turn” it oversized to dry (and warp a bit) and later twice turn it. Both of these ways must be completed with an even-walled final bowl. The even walls are critical because they will allow the wood to release moisture “evenly,” unlike the first example of the dry end-grain and wet center.
I hope that helps a bit.
We cover this thoroughly in Tree to Bowl – Understanding Green Wood http://www.TurnAWoodBowl.com/green
All the best to you and Happy Turning!
Kent
Hi Kent
Thanks so much for your teaching!
I really appreciate your style and have watched numerous YouTube videos of yours.
I’m new into turning and have only turned 7 bowls after some minor spindle work.
I love turning bowls for sure and have already cut a ton of blanks from free wood on OfferUp and Craigslist.
I have an older midi lathe that I can turn a max of 12” but have a huge desire for turning some bigger bowls.
I wish that I could afford a Robust like you have, however I’m retired and on a fixed income. Any information or companies that you’ve dealt with that have used bigger machines would be appreciated.
I’m just outside of Seattle.
Sorry to bother you with this and if you don’t have the time I totally understand.
I just signed up as a subscriber and just so appreciate your passion and thorough teaching style.
Thank you!
Paul
Paul,
Thank you for writing and sharing!
I understand keeping expenses in check.
While not as well-built as Robust lathes and not American any more, the Powermatic lathes are nice at a comparatively reduced cost.
I hope that helps. Happy Turning!
Kent
Kent: I bought a Craftsman 113 36″ lathe from a friend who was moving. I’ve used it to turn canes and walking sticks but always wanted to try bowls. I watched a few videos, tried one… and failed miserably. Then I watched some of your videos on YouTube, went back to the mess, I mean bowl, and got it finished correctly. Maybe a B- in junior high shop class, but it was MINE!
I like your teaching style. As a retired educator I admire how you get the idea across, give the pros/cons, right/wrong ways then repeat the main points at the end.
Thank you for the videos. I’m going to do some eCourses too.
-Paul
Paul,
Thank you for writing and sharing! I’m so glad you are having fun getting back into turning.
All the best to you and Happy Turning!
Kent
We appreciate you sharing your valuable information. That article is really instructive and helpful. I learned a lot about saws. keep up the good job. thanks for sharing.
Devid,
My pleasure. Glad this helped. All the best to you and Happy Turning!
Kent
Thanks for the insight, I have a question that echoes your earlier sentiment of doing things “not normally acceptable.” If I have a large enough log and wanted to make an integrated shelf and bowl (small floating vanity with a sink). Do you think it’s possible (or advisable) to split the log so the pith is off the bottom of the slab and cut the bowl out of the bark side of the split log. I know I won’t really be able to use a band saw, but with a little elbow grease, chainsaw work, etc. I figure I could potentially make a neat slab-and-bowl combined. Not looking for symmetry (won’t be able to turn on a lathe) so it’ll likely be a “natural” looking side grain bowl.
Or should I save myself the headache and make them separately and fix back together once I’m done?
Thanks!
Jonathan,
While I think this is all doable, I’d probably go about it differently. I’d consider focusing on making a really nice bowl, especially if it’s go to be a sink. And then, perhaps from the same tree, slab up a few flat pieces and create an awesome counter.
The idea of having it all turned from one piece is great, but can be very challenging and while cool, it might not yield the best results.
All the best to you. Sound like a great project!
Happy Turning!
Kent
I have a 75 Acre farm and thanks to two horrible tornadoes in the last 16 months, lots of wood. I love and appreciate the beauty of wood. For Christmas I was given a small lathe. I’ve read AWW articles and books, watched U-Tube videos, and read the lathes owner’s manual. As a result, I’m more confused than ever. Your article on turning green wood bowls is absolutely the most understandable and complete (with appropriate pictures) instructions I’ve come across yet. Thank you for not assuming your reader knows things and not skipping what might seem obvious to experienced turners. You are an awesome teacher and I thank you! Look forward to turning my first bowl — and hopefully finding more articles by you on using the lathe and woodturning tools!
Joy,
Thank you for writing and sharing your kind thoughts.
Well if you like this, you’re going to love the green wood online course I’m working on now.
I feel, especially based on all the questions I receive, that green wood is one of the biggest mysteries of bowl turning.
The course I’m creating will walk through everything we need to know and be thinking about when we turn basically any wood from a piece that blew down in a tornado last week to bowl blank handed down from a grandfather.
It’s time we had a proper discussion about green wood! 😉 Stay tuned.
Happy Turning,
Kent
PS – Hopefully you’ve found my YouTube channel also. https://www.youtube.com/channel/UCDwV2Djnj756vpxL51zd4Uw
Kent,
Have you ever used a wood splitter to cut larger logs in half?
How about a WoodMizer portable bandsaw?
BG
Good questions.
Yes, I’ve used a log splitter to reduce larger logs, but the split edge is usually very wasteful compared to a chainsaw cut.
I have not used a mill saw, but that should work a lot better than splitting, and almost as well as a chainsaw.
The chainsaw allows for easy angled cuts and more precision.
Happy Turning.
Kent, I have a big Cherry Tree crotch that I want to harvest for a bowl. Do I get two bowls out of that or one? I.e. do I leave the pith in? I thought that was a faux pas but your pic above shows just one bowl. Thanks for for all your help!
Chase,
You can get two bowls out of one crotch if it’s wide enough. If the crotch is large, you could potentially core out multiple bowls beyond the two large ones. It really all depends on how the tree grew, too. Sometimes there’s only one “good” side to the crotch and the opposite side can be sacrificed a bit, if necessary.
Let me know if that helps.
Happy Turning,
Kent
Wow, I’ve learned more reading here over the last hour than I’ve learned from the last three months of YouTube videos. Your teaching style does not leave me feeling like I’m being talked down to, and your lessons learned and passed along can potentially save anyone reading countless learning curve issues. My wife and I are both just beginning to explore the idea of purchasing a nice lathe and adding this pastime to our planned retirement in 2021. Thank you for this site and all the efforts you place in to it. It is much appreciated.
Hello Kim,
You are why I make this website! I want to help and show people the answer that need to be covered to learn to turn great wooden bowls.
I’m thrilled to read your words and I know you will have a great time learning and turning in retirement with your wife.
Enjoy and please let me know if there’s anything you’d like to learn more about that you haven’t found on this site.
All the best to you and your wife!
Happy Turning,
Kent
Thanks Greg for good article!
From Russia with love.
Good luck!
Thanks Greg,
So, what types of wood do you like to turn in Russia?
Have you ever Micro-Waved green wood after initial shaping? Have a source for this subject or opinions? In that I cut small blank sticks to resaw to length of 1″ to 3″ 30 degree with no attension to the outside as all four sides will be further prossed, (3/4″ x 1″ x 12 to 18″lg) this could be very doable for me. I would need purchase an used one, my Wife hung a sign on ours saying “NO WOOD!”. Of course I stood my manly ground as man of the house and all that with an resounding “Yes Dear!”.
Great article!
After cutting on the bandsaw I put the blanks in a paper bag with some shavings from the chainsaw. With most blanks I rough turn them to about an inch thick and put them back in the bag with shavings and let dry from a few weeks to a few months. Once dry I finish turning them. I’ve had great success with this method. My favorite wood is hard maple. I lose very few blanks to checking with maple. I generally rough out around 50 at a time and might lose two or three blanks out of that batch.
Sounds like a great time-tested and productive process you have going, Greg! Thanks for sharing and Happy Turning!
OK merci pour votre retour
merci pour ce reportage , est ce que vous recupérer les tronc a une époque précise de l année??
(thank you for this report, do you recover the trunk at a specific time of the year ??)
L’hiver est le meilleur moment pour ramasser du bois pour les bols de bord naturel. L’écorce restera généralement attachée plus longtemps. Cependant, en général, je récolte du bois chaque fois qu’il est disponible.
(Winter is the best time to collect wood for natural edge bowls. The bark will usually stay attached longer. However, in general, I collect timber whenever it is available.)